- Android smartphones have serious customization skills that ensures you get access to countless possibilities.
- We have been building these tips and tricks, right from Wi-Fi Analyzer to pinning apps, to making it easier to unlock your phone using more ways than you can.
- Check out our take on the July 2025 edition of Android Tips and Tricks.
The Android OS is pretty powerful on its own, but there’s more to it than meets the eye. Android tips and tricks are a goldmine of countless customization options on your phone that you might not be aware of but can do wonders. These tricks assist you in ways unimaginable to bring the best out of your smartphone, and we at True-Tech have collected some of these tips for you.
5 Android Tips and Tricks You Must Try in July 2025
From customizing quick settings for ease to registering biometrics making it easier to unlock the phone, here are five best tips and tricks we came across to give you an edge in your user experience. Let us know which ones are your favorite, though.
Customize Quick Settings Menu
Probably one of the best features on Android phones is the Quick Settings menu on its notification panel. It gives you access to shortcuts such as turning on/off mobile data, Wi-Fi, Bluetooth, etc. As a general rule of thumb, when you swipe downwards to roll in the notification panel, you get 5-6 quick settings. Do another swipe downwards, and you get more quick settings plus, there are more options when you swipe right on the pane.
The best Android tips and tricks you can use here is to customize the Quick Settings to get shortcuts/options that you use the most right in front. I usually have “Wi-Fi, Bluetooth, Mobile Data, Torch, Ringer, and a Screenshot” settings on the primary pane followed by more prioritized options on the secondary pane. The goal here is to reduce friction when accessing ‘quick settings’. Here’s how to do it.

Step #1: On your phone’s home screen, swipe downwards to get to the notification panel with primary quick settings.
Step #2: Swipe downwards again to reveal a full-fledged secondary quick settings.
Step #3: On the top-right corner, you will see the option to ‘Edit’, click on it.
Step #4: Now, you need to edit ‘Top’ or primary quick settings where you can add or remove tiles and move their positions, assuming you only have 5 or 6 slots in the primary pane. Hit ‘Done’ when you are satisfied with the changes.
Step #5: When editing the secondary or ‘Full’ quick settings, you have ample slots and options to fill in, allowing users to grab tiles based on priority. Save the arrangement by tapping on ‘Done’.
Use Adaptive Brightness Wisely
We are human beings and as a species, we wander around our homes, offices, parks, malls, jogging tracks, etc., and the common thing here is, we don’t forget to use our phones wherever we go. Depending upon whether it’s daytime or nighttime or the ambient light around you, you might find your phone screen’s brightness too bright or too dim to view, which means you have to manually adjust the brightness every time you switch from indoors to outdoors and vice versa. But there should be a smart way around it, isn’t it?
Your Android phone has a feature called ‘Adaptive Brightness’ which, as the name suggests, changes the brightness of your display based on the ambient light available. For instance, it can be dim down a lot when it senses you are indoors or spike it up to its full extent when you are walking outdoors under direct sunlight.
I personally feel this is one of the best features as, technically, I don’t have to keep changing the brightness whenever I switch from indoors or outdoors. Here’s how you can use this feature on your phone.
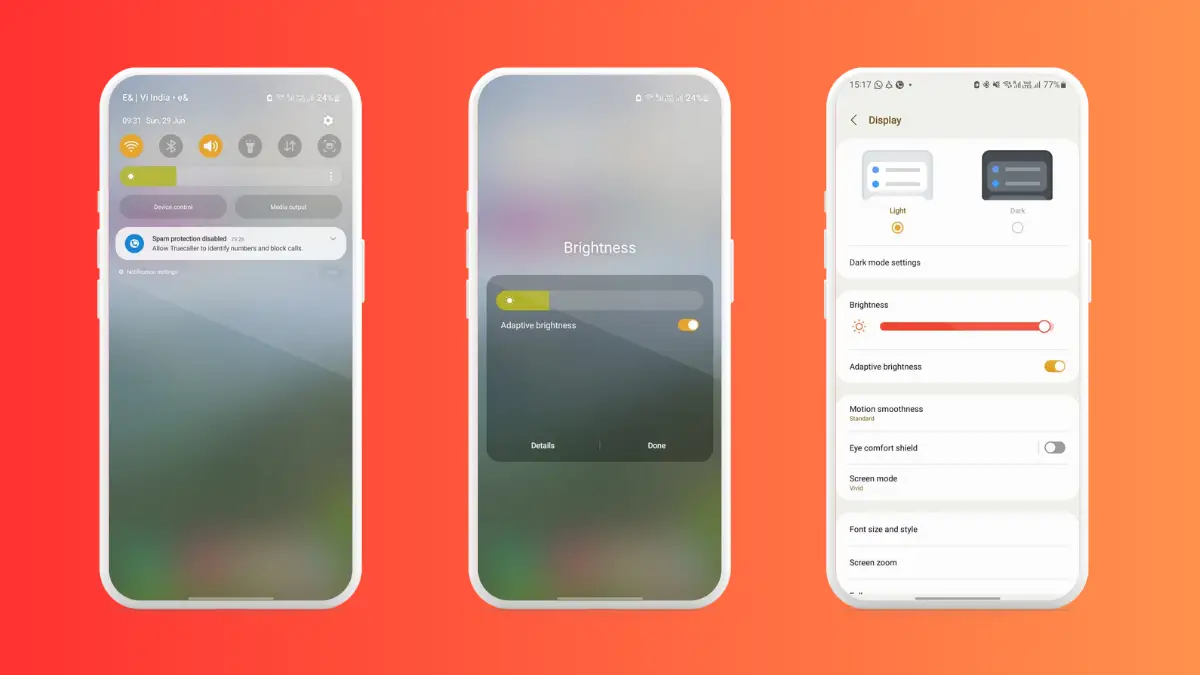
Step #1: On your home screen, swipe downwards to reveal the notification panel.
Step #2: You will see a brightness level option just under the quick settings with the current brightness set.
Step #3: Click on the three vertically stacked dots to reveal more options.
Step #4: Flick the toggle against “Adaptive Brightness” to turn it ON.
Step #5: Save the settings and voilà, it’s done.
Alternatively,
Step #6: You can go to “Settings >> Display “to reach the same brightness-related settings.
Related
Register Multiple Fingerprints For Ease
Usually, I register biometrics on my right hand’s thumb to unlock my phone, as it has an under-display fingerprint scanner. My previous phone had a side-mounted scanner and that’s handy with the thumb as well since I am a right-handed person, I don’t usually register left-hand biometrics, but that’s something I changed recently.
Many times, it might happen that you can’t unlock the phone using your right hand’s thumb because you are carrying someone or eating something, or just in an awkward position that would allow you to unlock the phone with the primary finger you registered earlier. In this case, I would register a few more fingerprints such as the thumb of your left hand and index fingers of both as it gives you flexibility to unlock your phone with ease and not rely on a single biometrics. It is more about convenience.
It eventually makes your daily life easier, and that’s why I wanted to include it in the latest edition of Android tips and tricks.
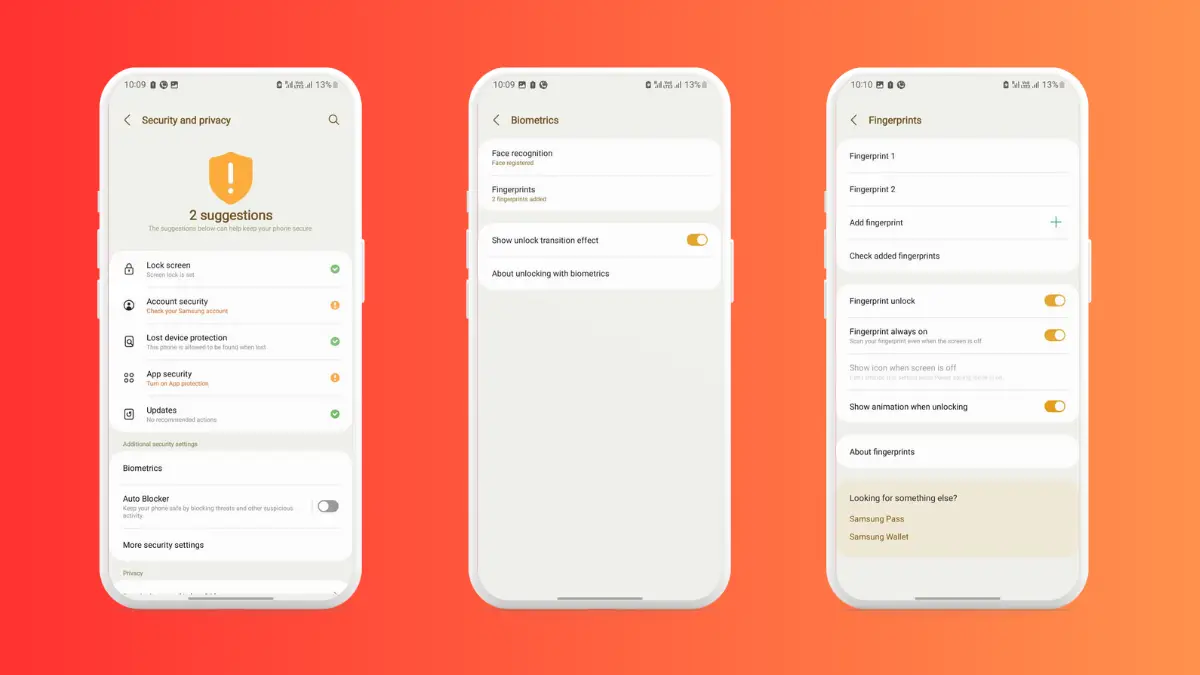
Step #1: Go to Settings >> Security >> Biometrics on your phone. Note that depending on the smartphone maker, the analogy used here might differ.
Step #2: Tap on “Fingerprints” and use your existing phone pin to unlock.
Step #3: Click on “Add Fingerprint” and follow the on-screen instructions to add a new fingerprint.
Step #4: Repeat this multiple times with different fingers that you might use for ease, and it’s done.
Step #5: Lock the phone and try unlocking using the newly registered biometrics.
Strike a Cord With App Pinning
Have you ever felt as if your friends would intentionally browse through your phone when you were showing them something else? How do you stop such snooping without showing them you are hiding something? Well, that’s where Screen Pinning comes to play. The feature is available on Pixel devices and may or may not be available on your phone just yet, but hey, there’s no harm in knowing it in case you get it in the future.
App Pinning allows users to pin an app that prevents people from browsing or landing on some other app. It’s like you gave your phone to show a funny photo you clicked and someone deliberately checks out your Instagram, the app prevents that. It secures the screen with a phone PIN, so unless you don’t provide that PIN, the app ain’t changing.
Where’s the Strongest Wi-Fi Signal?
I get it, we are trying to deviate you from what’s readily available on your phone to using the Google Play Store, but it is worth every penny. You know how you end up strolling your home or office trying to find a good Wi-Fi signal. It is especially true if you are downloading larger files or need an active internet connection such as when on a call or a meeting or streaming something where fluctuating Wi-Fi signal can be a problem.
There are plenty of apps on Google Play Store that can help you find spots with the best (and the worst) Wi-Fi signals. It helps you find spots where you get quality Wi-Fi signal strength and avoid places where it is worse. Some apps you can use are Wi-Fi Map, WeFi, and Fing.
Wrapping Up
We found some interesting Android tips and tricks you can use in your daily lives, whether it’s for searching Wi-Fi signal strength or unlocking your phone with multiple biometrics and beyond. Android as an OS keeps evolving, and we take this as our responsibility to educate our readers on tips and tricks that can be of great asset in the Android ecosystem.
You can read our June 2025 edition of tips and tricks right here. Stay with us as we bring the best of the Android ecosystem on tap on your finger.