Are you searching for a tutorial on how to recall an email in Outlook? Look no further! Outlook’s “Recall This Message” feature is an easy and efficient way to retract that wrongly sent message or typo-filled email. With just a few simple steps, you can recall an email in Outlook and take control of your inbox.
Whether you accidentally included sensitive information or sent it to the wrong person, this feature is designed to help you recall an email in Outlook in case of such scenarios.
However, it’s important to note that the success of the recall feature depends on the recipients and their email client settings. They may choose to ignore the recall request, or their email client may not support the feature. But don’t let that stop you from trying!
With our guide, you’ll be able to recall an email in Outlook with ease and make sure that unfortunate email is a thing of the past. In this guide, we will walk you through the process of recalling an email in Outlook, and also give you tips on how to increase the chances of successful recall. Don’t wait, start recalling those emails today!
Here’s How to Recall an Email in Outlook
Want to recall that unfortunate email you just sent in Outlook? No problem! Follow these easy steps to recall an email in Outlook, no matter what device you’re using. Whether you’re on a desktop or mobile device, our separate tutorials will guide you through the process of recalling an email in Outlook.
1. How to Recall an Email in your Outlook on your PC
Recalling an email in Outlook has become way easier on a PC than on Android or iOS, make sure you have logged in with your account on Outlook.
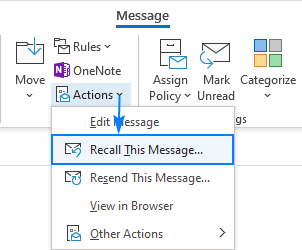
- Open Outlook and go to the Sent Items folder.
- Right-click on the email that you want to recall.
- Click on “Recall This Message” from the drop-down menu.
- A new window will open. Select “Delete unread copies of this message” if you want to delete the email from the recipient’s inbox, or “Tell me if recall succeeds or fails for each recipient” if you want to know if the recall was successful.
- Click on “OK” to start the recall process.
- Wait for the recall process to complete. You will receive a notification in your inbox if the recall was successful or if there were any issues.
The recall feature is only available for emails sent to recipients within your organization and may not work if the recipient has already read the email.
2. How to recall an Email in Outlook on your Android?
To recall an email in outlook email is easily done with a few simple steps.
- Open the Outlook app on your Android device.
- Go to your inbox and locate the email you wish to recall.
- Press and hold on to the email until a menu appears.
- Select “Recall This Message.”
- A window will appear asking if you want to delete the message from the recipient’s inbox or replace it with a new message. Select your preferred option.
- If you choose to replace the message, compose your new message and click “Send Recall.”
- If the recall is successful, a message will appear confirming that the email has been recalled.
The recipient must be using Outlook and have their email settings configured to allow recalls for this feature to work. Additionally, recalls may not be successful if the recipient has already read or deleted the email.
How to recall an Email in your Outlook on your iOS?
- Open the Outlook app on your iOS device.
- Go to the Sent folder and find the email that you want to recall.
- Tap and hold on to the email until a menu appears.
- Select “Recall This Message“.
- A new window will appear with the option to delete the email from the recipient’s inbox or replace it with a new message.
- Select the option that you prefer and then tap on Recall.
- A notification will appear to confirm that the recall was successful.
The recall feature only works if the recipient’s email server supports it and if they have not yet read the email. Additionally, it may not be possible to recall an email if it has been forwarded or if the recipient has saved a copy of the email.
Can’t Recall Email in Outlook? Here’s What to Do:
Unfortunately, once your email has been opened by the recipient, it’s too late to recall it in Outlook. But don’t despair, there’s still a way to prevent sending an email you regret. One solution is to take advantage of Outlook’s built-in delay send or schedule send feature.
This allows you to set a delay on your emails before they are sent, giving you more time to review, edit and make sure they are accurate and appropriate. That way you are less likely to having to recall an email in Outlook.
If you frequently respond to emails, send sensitive information, or just want to double-check your emails before they’re sent, postponing or scheduling your emails in Outlook can be a game-changer. The process is simple and can be set up for all of your Outlook emails. By following the few easy steps mentioned below, you can ensure that you’re sending the right message, to the right person, at the right time.
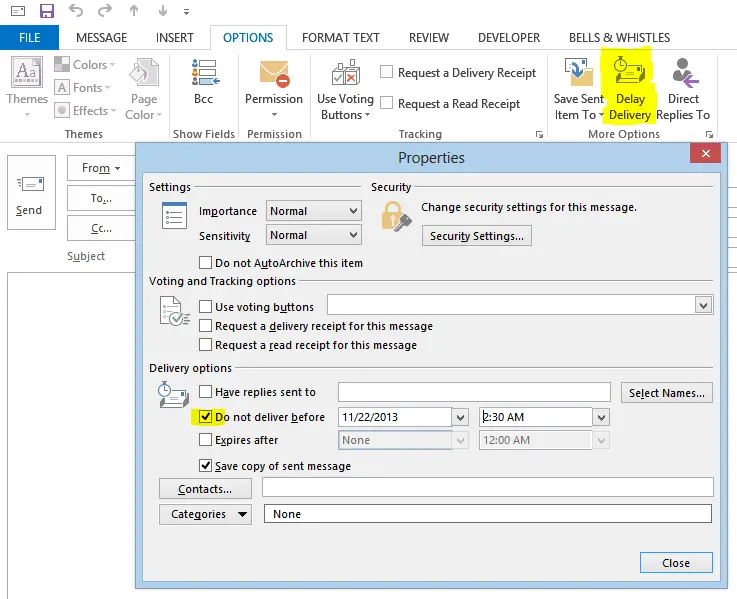
- In Outlook’s upper-left corner, click File.
- Click “Manage Rules & Alerts” once you have scrolled down a little.
- On your screen, the Rules and Alerts window will appear. Choose the “New Rule” option from this point on.
- You’ll see another pop-up window. On this page, choose “Apply Rule on Messages I Send”. As you can see, it is stated under Start From a Blank Rule. To proceed, click the “Next” button.
- For the next step, click. A confirmation screen will then show up. To confirm, click “Yes“.
- Decide on Defer Delivery. by selecting a number of minutes. A Number of links should be selected. You’ll be prompted to select your chosen duration on a pop-up screen that will display.
- Click the “OK” button after entering the desired number (the maximum is 120 minutes). After completing all of the stuff, click Next.
- Give your rule a name, click “Next”, and, if applicable, select the Turn On This Rule checkbox. Click the “Finish” button to finish.
Final Verdict
While the recall feature in Outlook can be a lifesaver, it’s important to note that there is no guarantee of success and the recipient may have already read the email. Additionally, the feature is only available for emails sent to other users on your Exchange server.
It’s always a good idea to double-check your emails before sending them and consider using the delay or schedule feature in Outlook to give yourself more time to review and make sure they are accurate and appropriate.
If you found this guide helpful to recall an email in Outlook, don’t hesitate to share it with your friends and colleagues! And for even more magic and pro-tips similar to how to recall an email in Outlook, subscribe to our newsletter today! Trust us, you won’t regret it. You’ll be the Outlook and tech ninja in your office in no time.